Perfectly Crispy Yet Soft Dal Vada recipe | Parippu Vada
Healthy, vegetarian and infinitely customizable to suit dietary needs and flavour preferences, crispy parippu vada (Chana Dal Fritters) served alongside cooling coconut or coriander chutneys makes for a soul-satisfying anytime snack. Dip in and savour authentic Indian street food at home. Also, known as Dal Vada, Masala Vada, paruppu vadai in various parts of India.
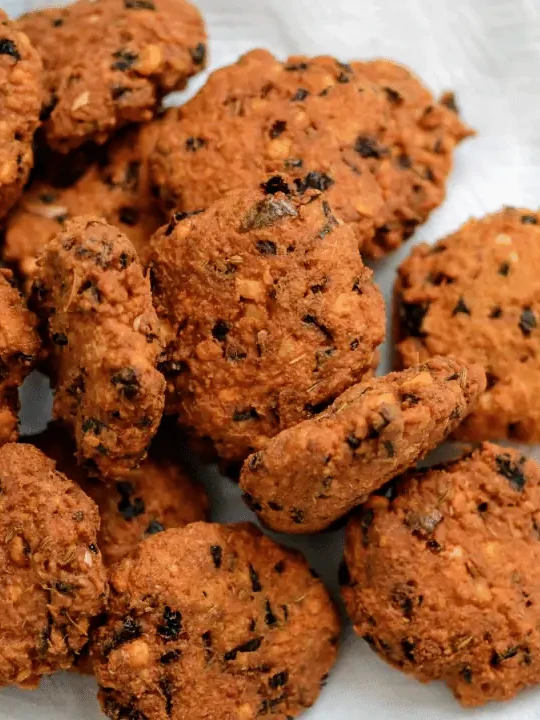
You bite into the golden, crispy exterior and discover an explosion of soft, flavourful spiced lentils inside accompanied by an evening tea. This is the magic of a well-made parippu vada – or lentil fritter – a beloved snack across South India and beyond.
But achieving the ideal balance of crispiness and soft, fluffy interior can be deceptively tricky, especially for vada novices.
Let’s make some dal vada, also known as masala vadai or paruppu vadai in some parts of South India. There are numerous names for this evening snack by the way.
This crispy masala vada recipe is also made with toor dal but the most common vada recipes are typically made with chana dal or bengal gram.
Through years of trial-and-error in my home kitchen, I’ve unlocked the secrets behind preparing the perfect parippu vada every time. Today, I’m thrilled to share my foolproof, step-by-step parippu vada recipe so you too can master this irresistible street food-inspired fritter.
This dal vada recipe is vegan, gluten-free and keto friendly too so if you are a health addict you can rest easy.
Ingredients You’ll Need for Dal Vada
Part of achieving vada greatness lies in using the right supporting ingredients. For the fluffiest yet sturdy interior, I prefer:
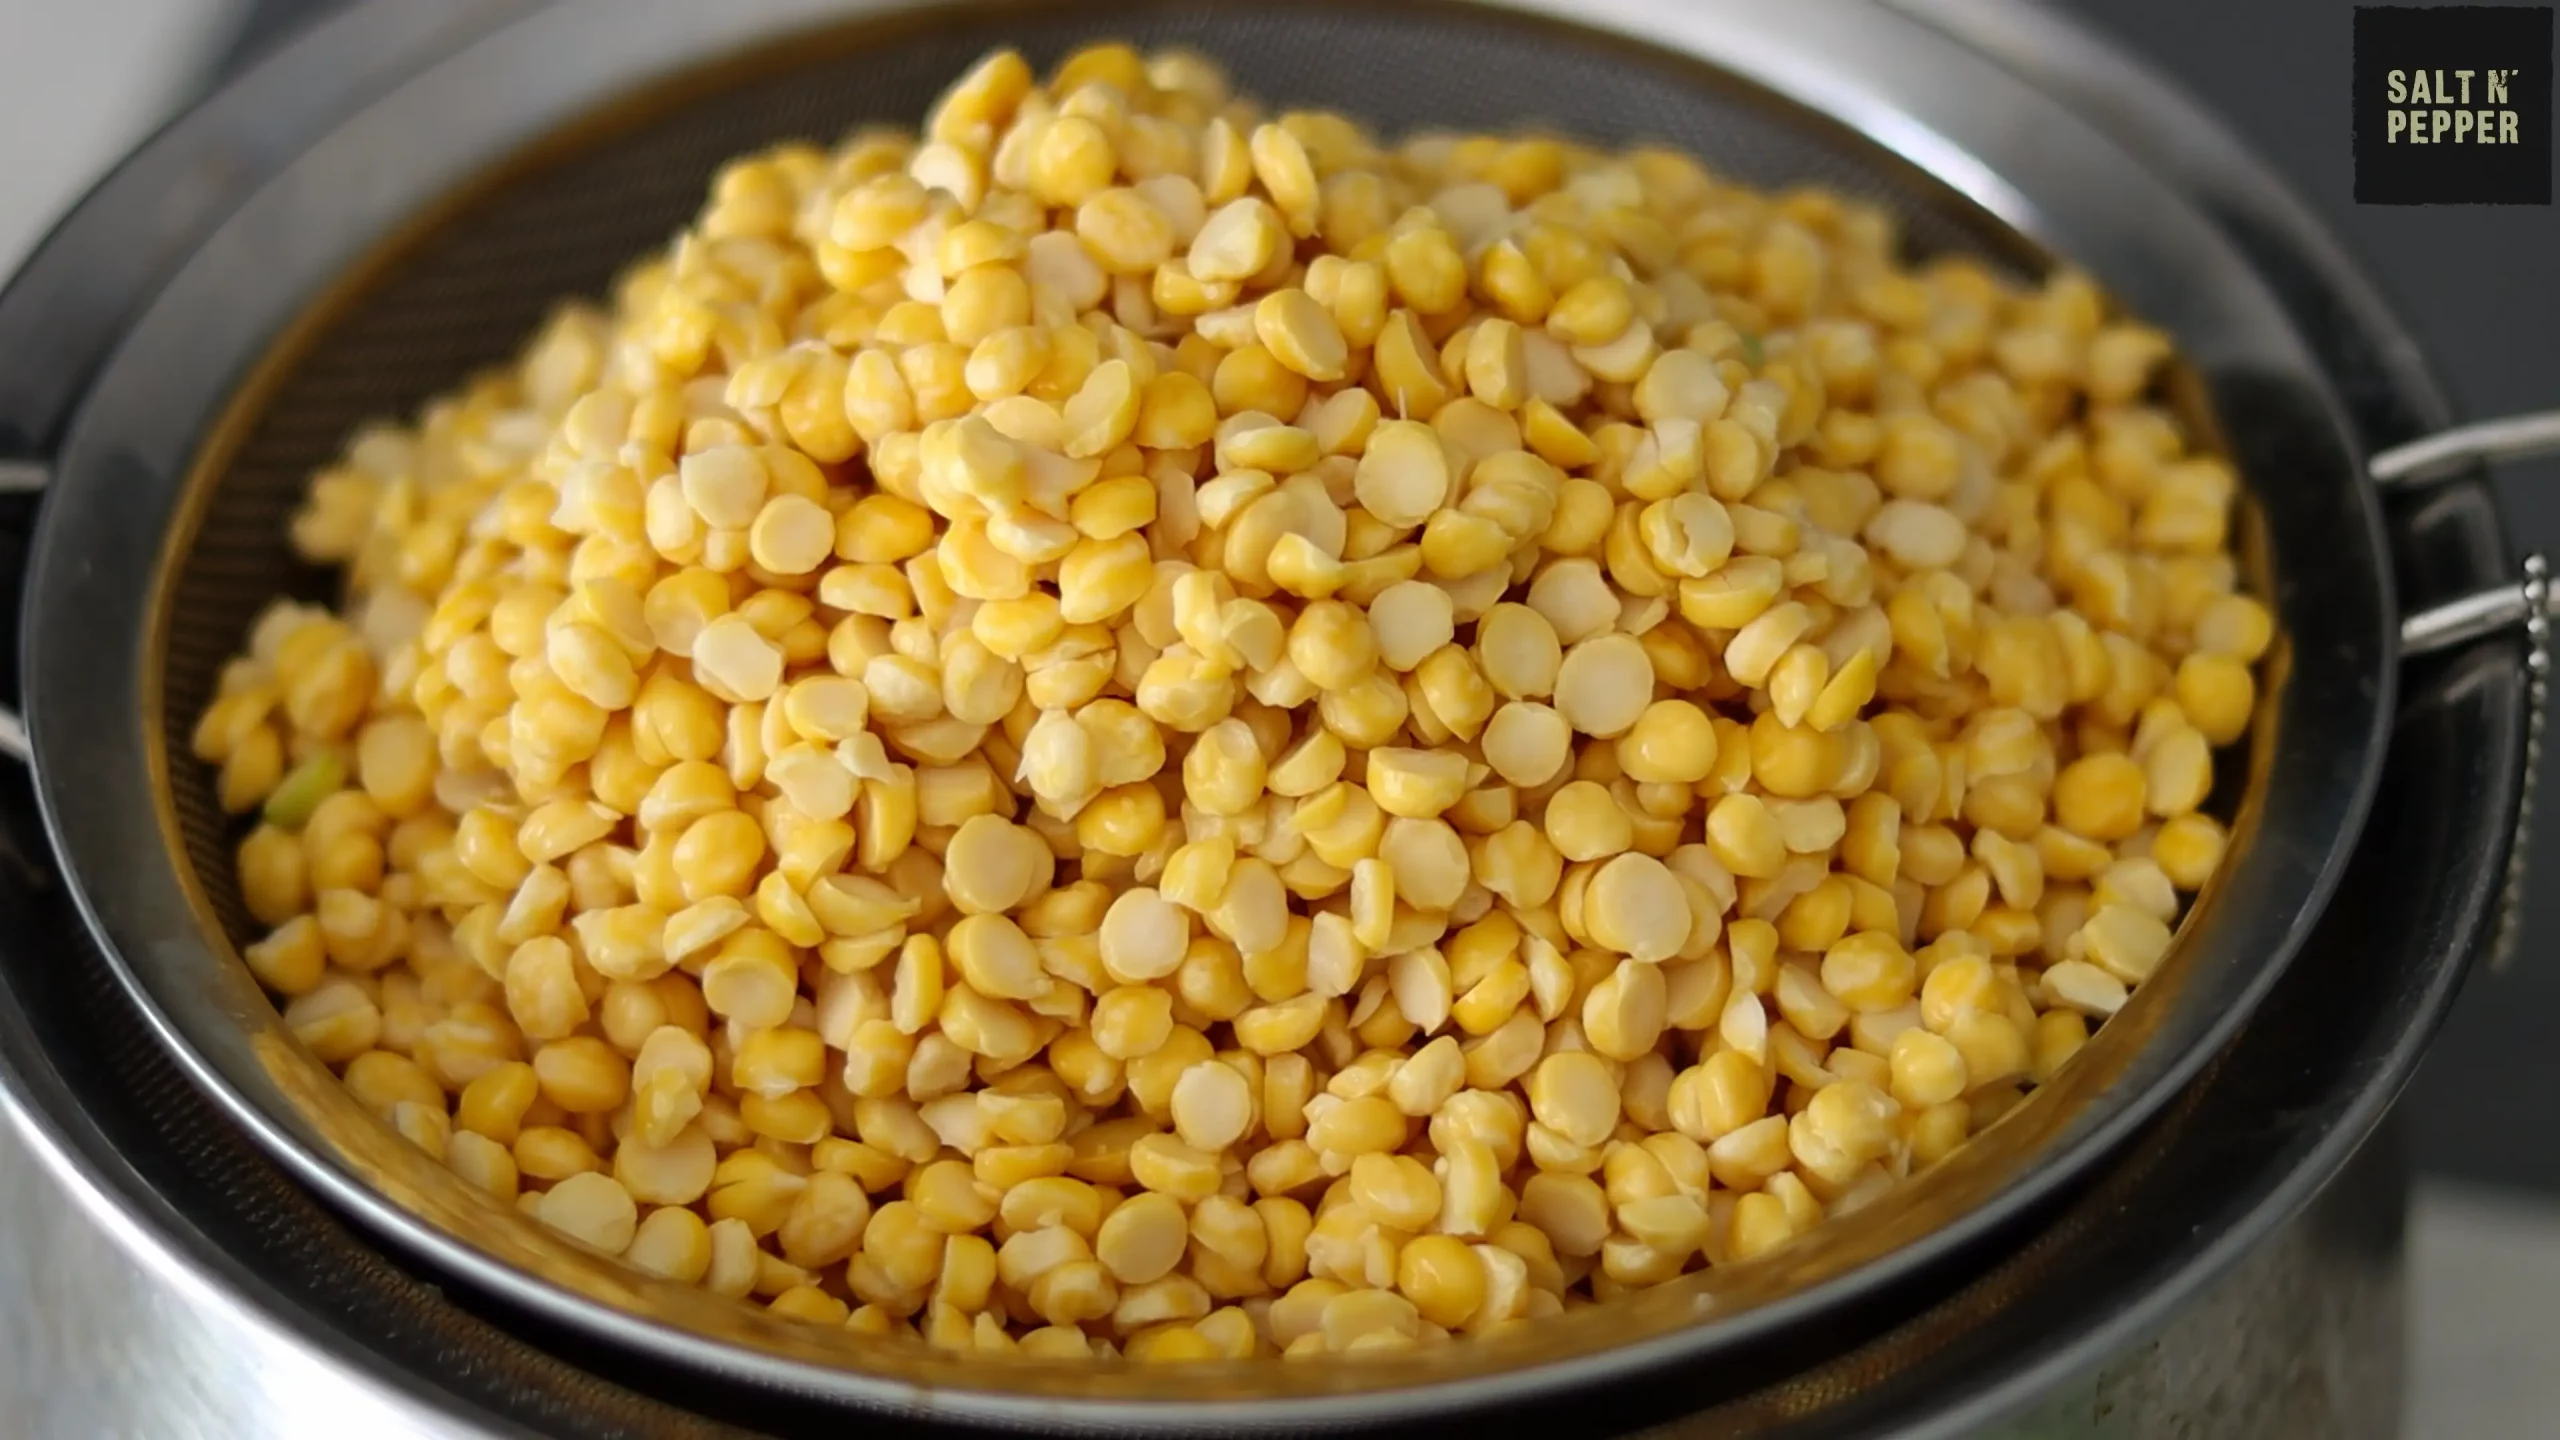
- 1 cup chana dal (Bengal gram)
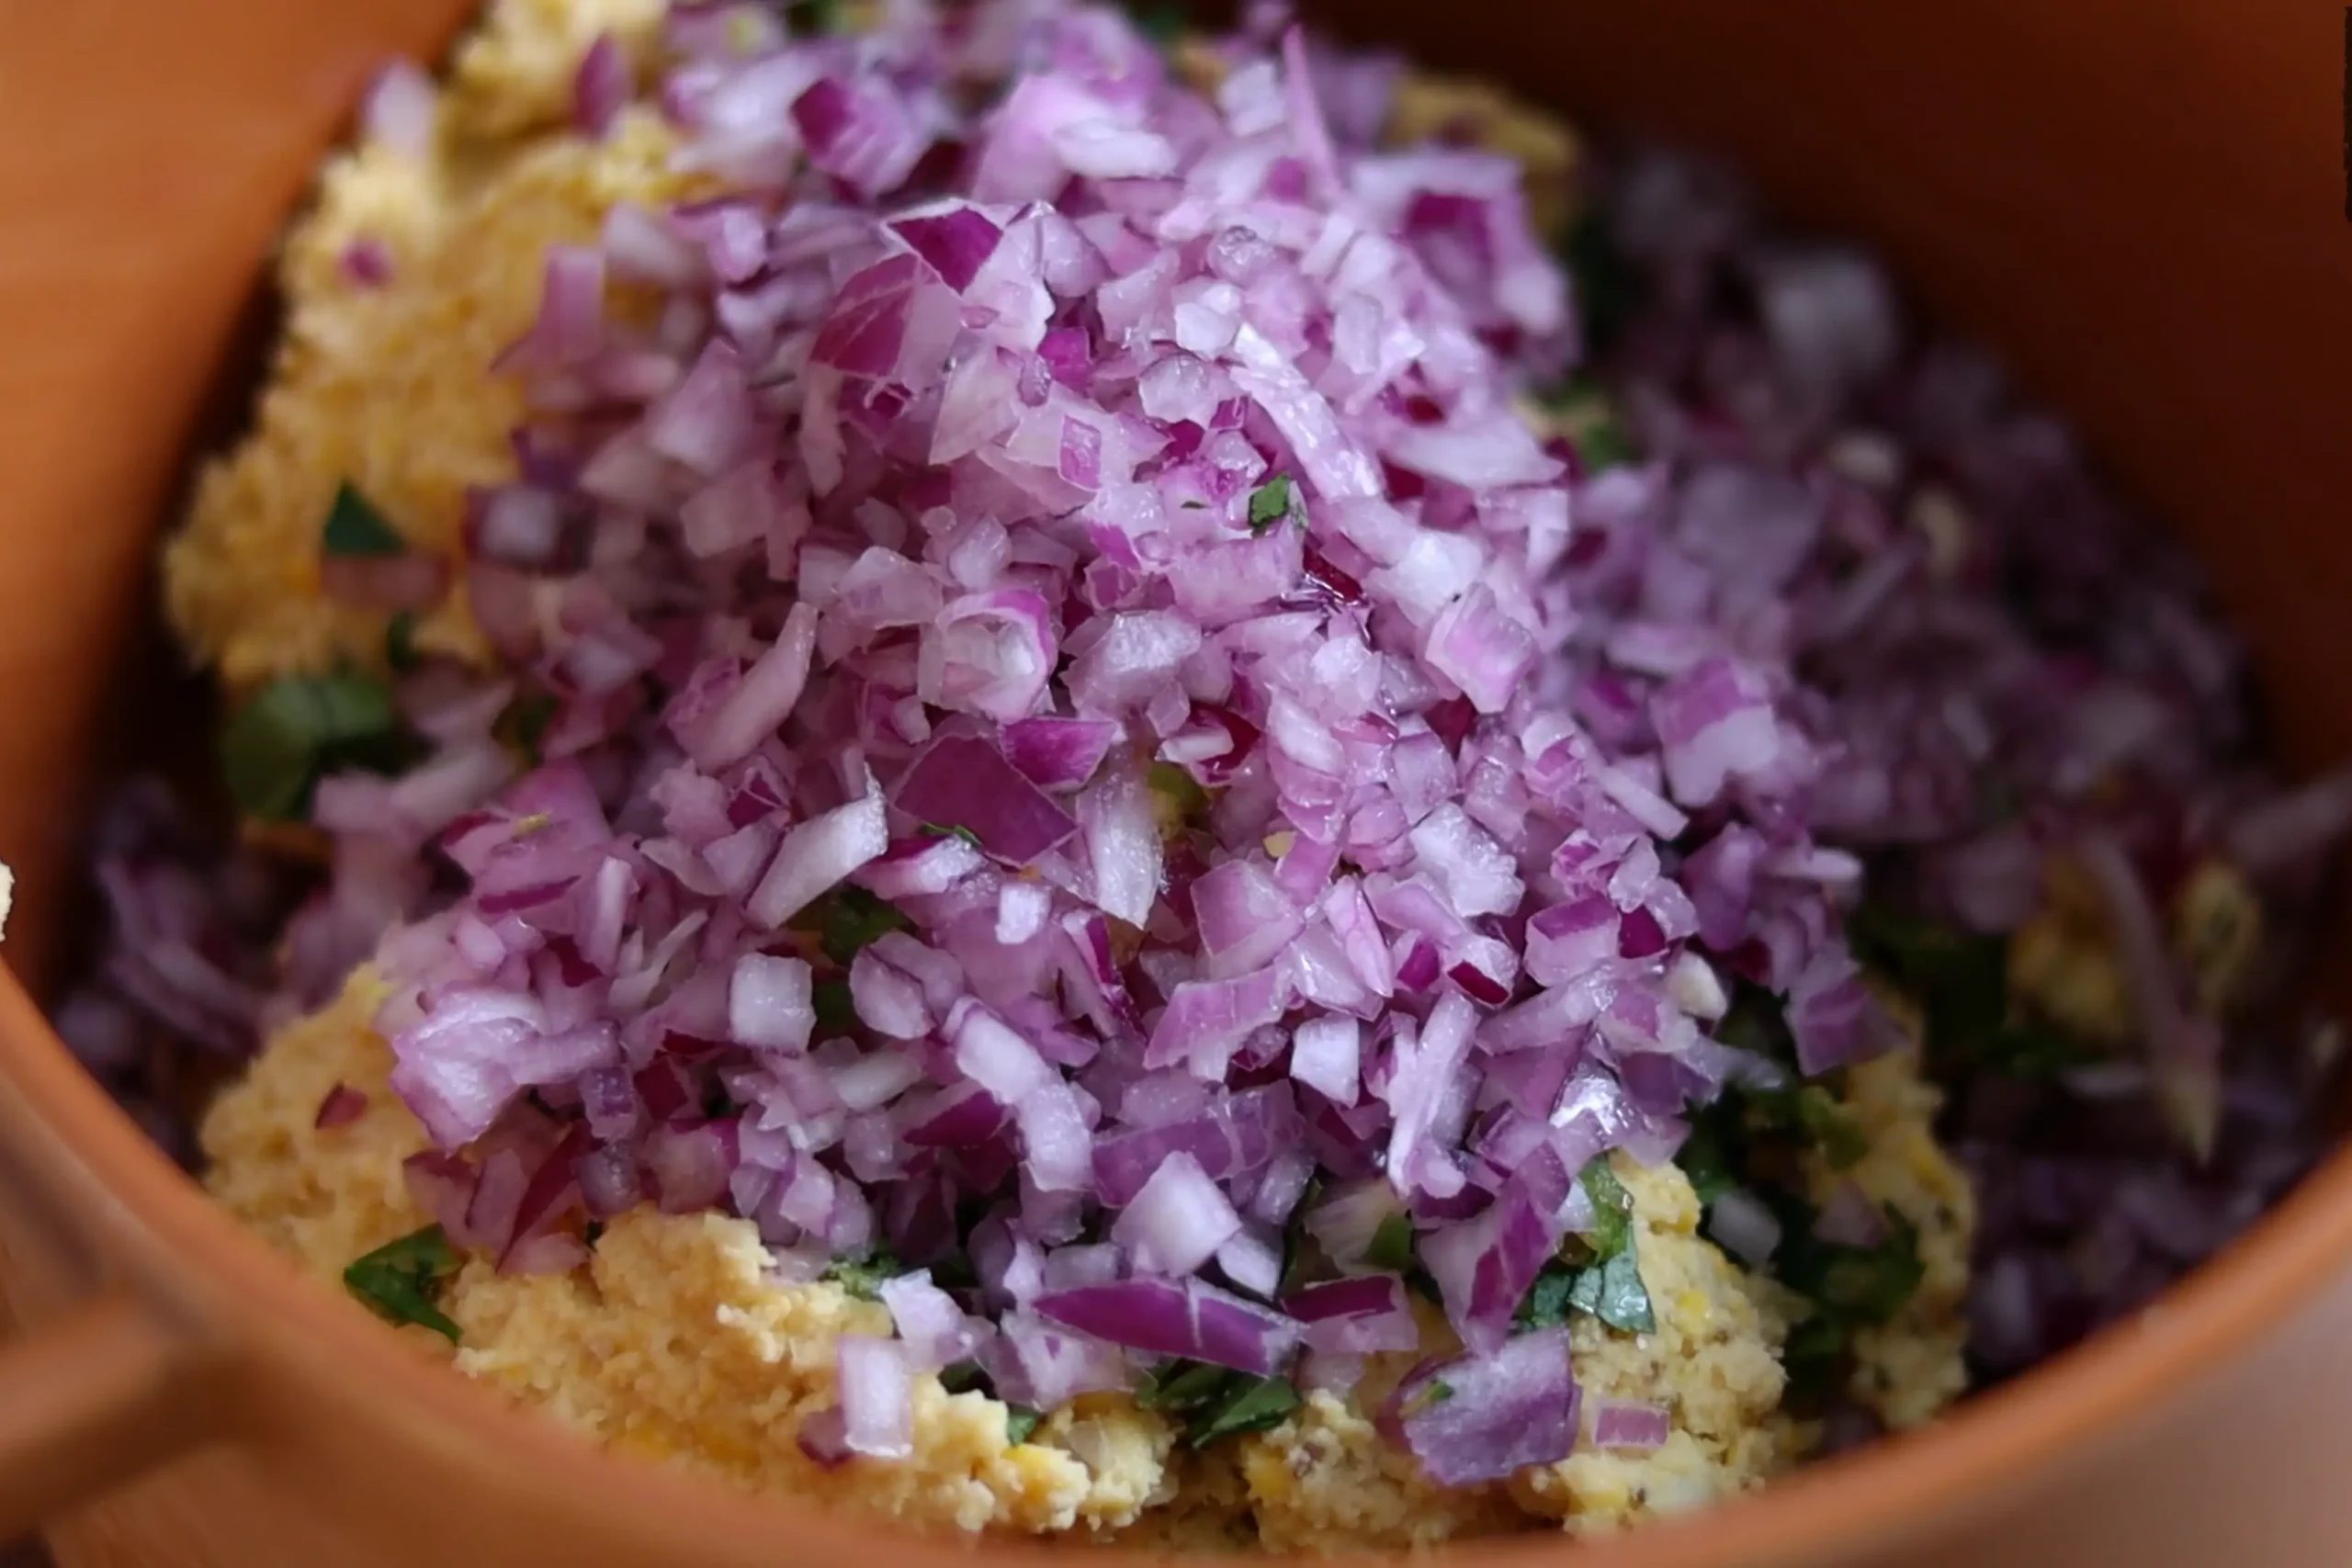
- 2 medium onions, finely chopped
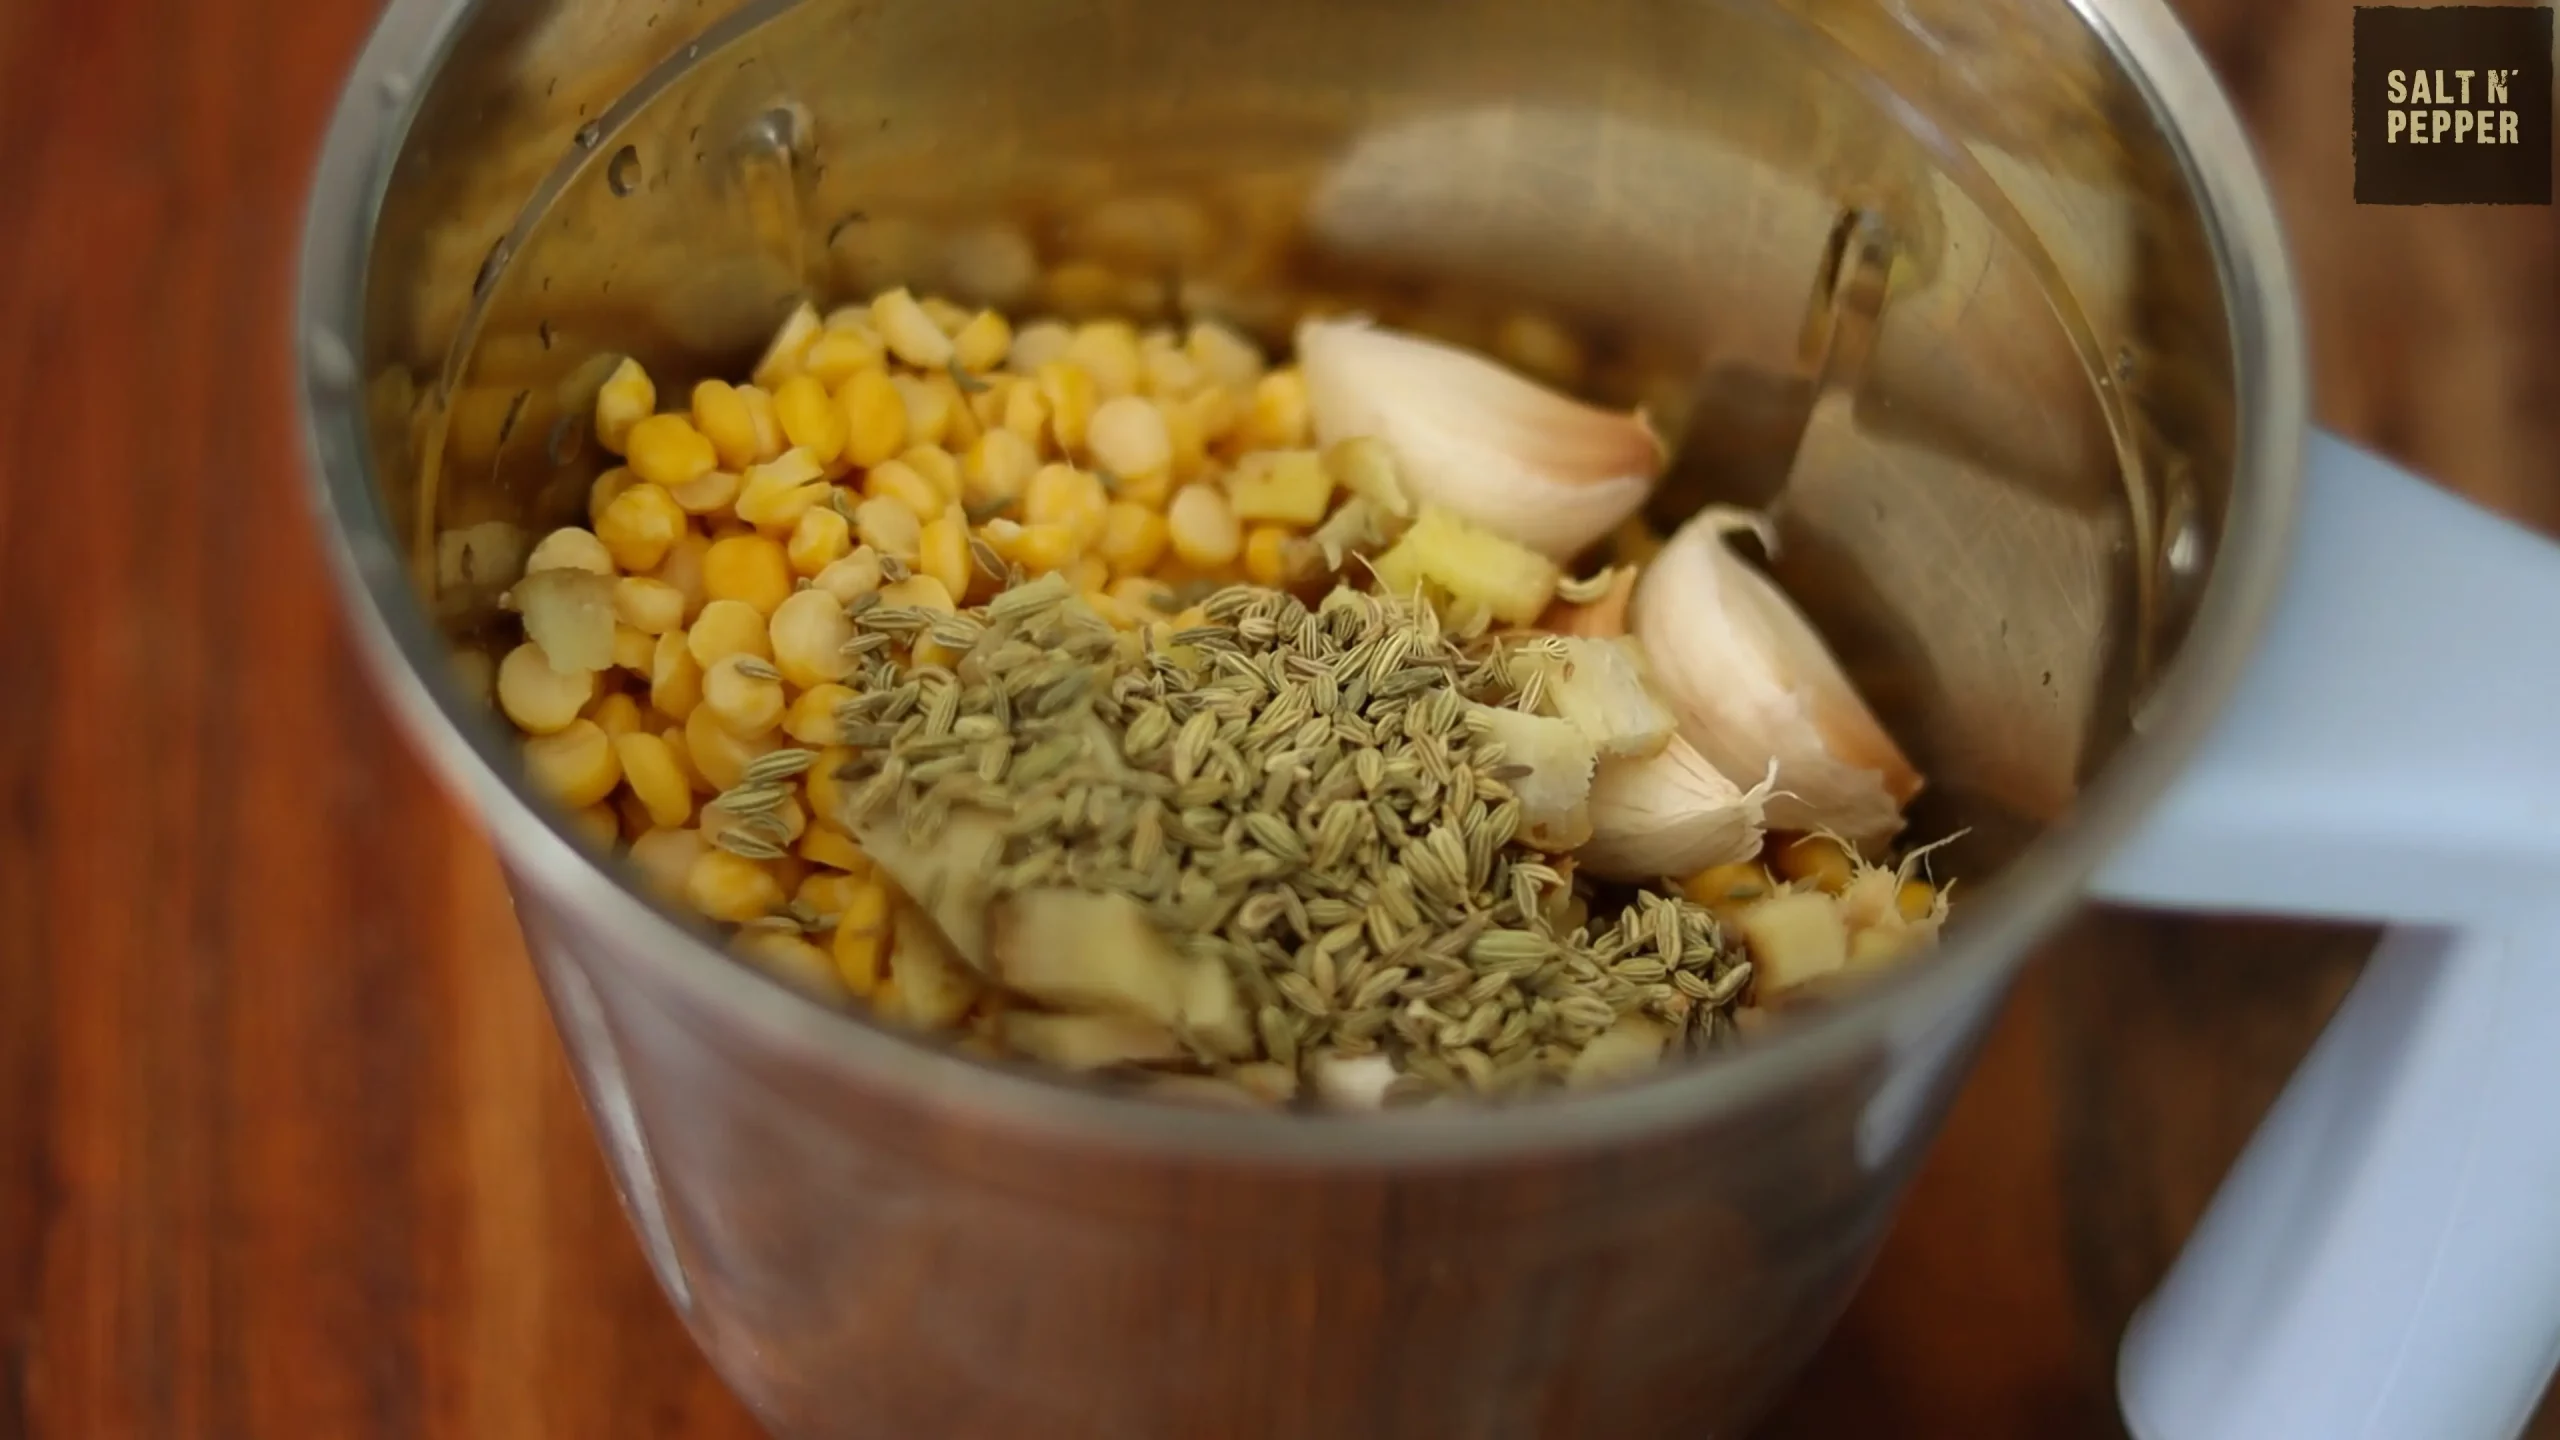
- 6 cloves garlic
- 1 inch ginger, roughly cut
- 2 tbsp fennel seeds
- 6 green chillies, minced. Please note that we used frozen green chillies so the spice levels are mild. If your chillies are spicy( the ones that you get in India), adjust accordingly
- Handful or 5 sprigs fresh curry leaves, finely chopped
- Oil for frying (peanut, vegetable, coconut, etc.)
- salt to taste
This combination creates a flavourful, aromatically spiced lentil mixture that holds its shape during frying for that essential crispy shell surrounding a soft filling.
Now, let’s get cookin’!
Step-By-Step Parippu Vada Cooking Instructions
Making picture-perfect parippu vada is surprisingly easy when you follow a few key tips I’ve learned over the years.
- Soak 300 gms of Chana dal or bengal gram and leave it aside for 2 to 4 hours. The sweet spot is 4 hours for soaking lentils for the best vada texture.
- Drain the soaked dal ( for 2 hours) and transfer to a mixer grinder or a blender. Add the garlic, ginger and 1 tbsp fennel seeds. Grind to a medium coarse texture, scraping the sides as needed. The texture should have some whole dal remaining for that extra crunch while biting into the vadas. Do not add water while grinding. You will need to use a high speed mixer grinder to get the correct texture for the batter. If you have a blender or food processor, it will work too, you just need to grind it for longer.
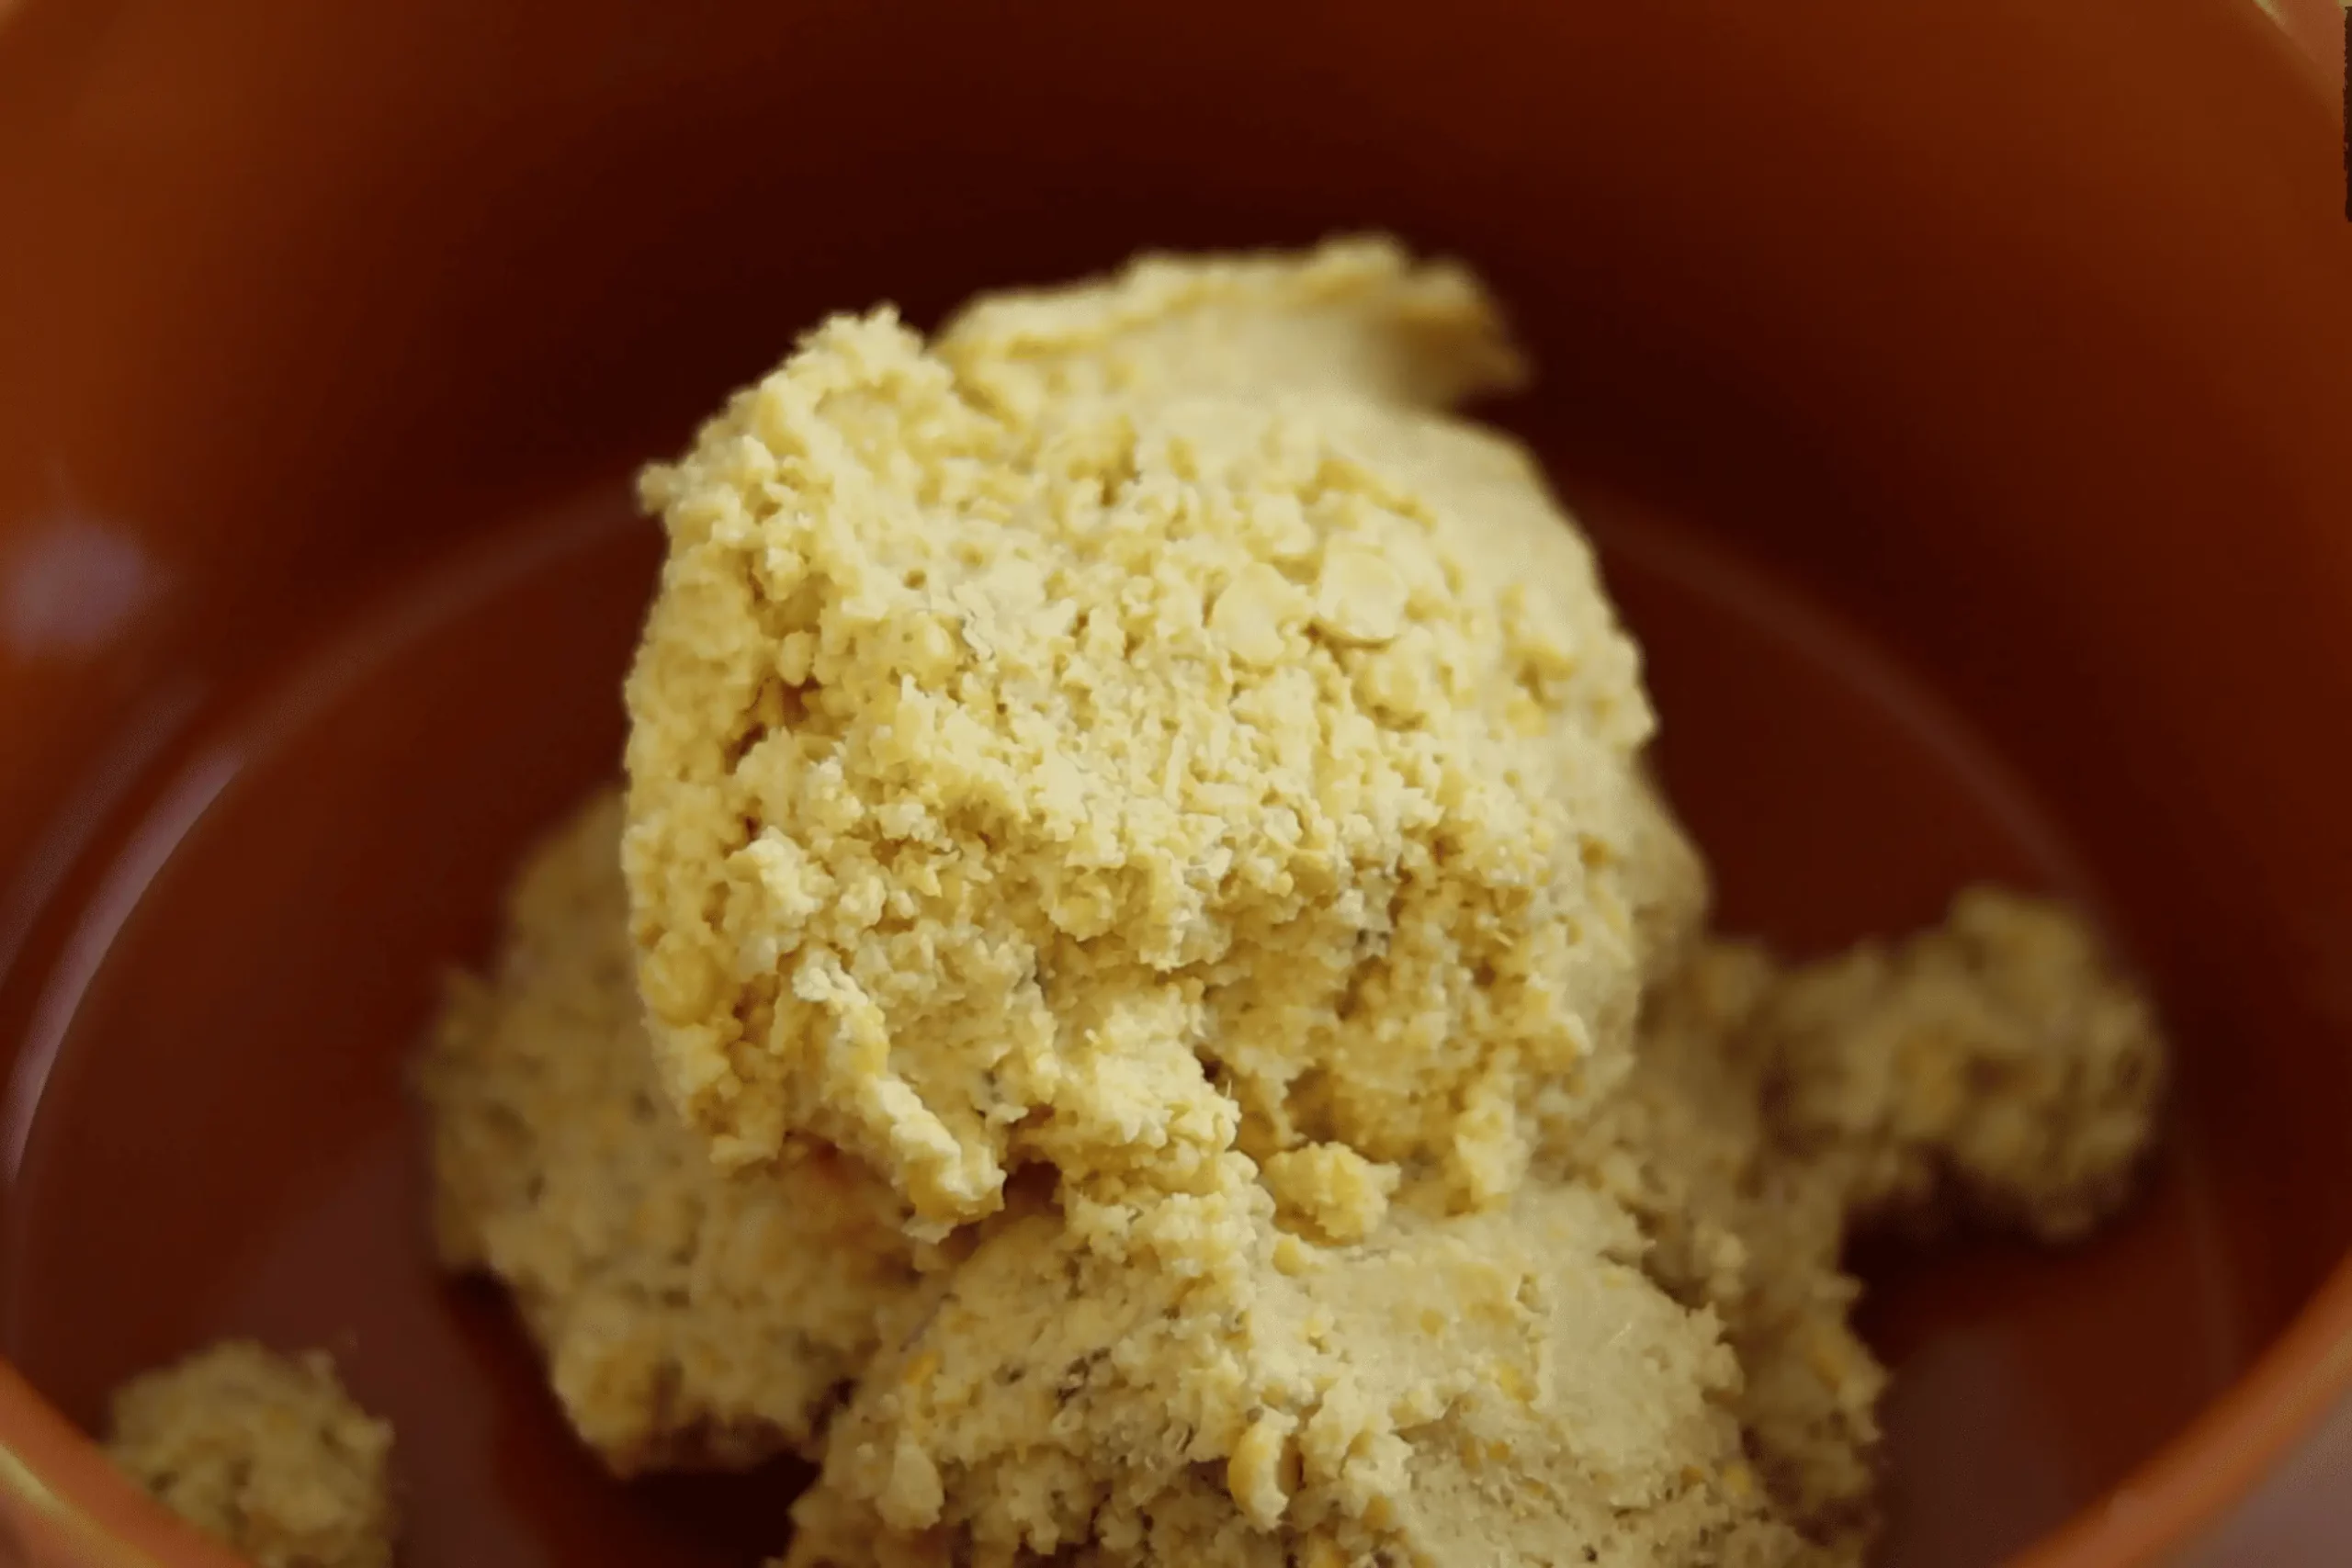
- Transfer the coarse mixture to a mixing bowl. Season the ground dal mixture with salt to taste, curry leaves, green chilies, onions and 1 tbsp fennel seeds. Mix everything well, using your hands if needed. Do not add any extra water.
- Heat oil in a deep bottom pan or kadai on medium heat or flame. Test oil temperature by dropping a small bit of batter – it should sizzle on contact and should rise to the top.
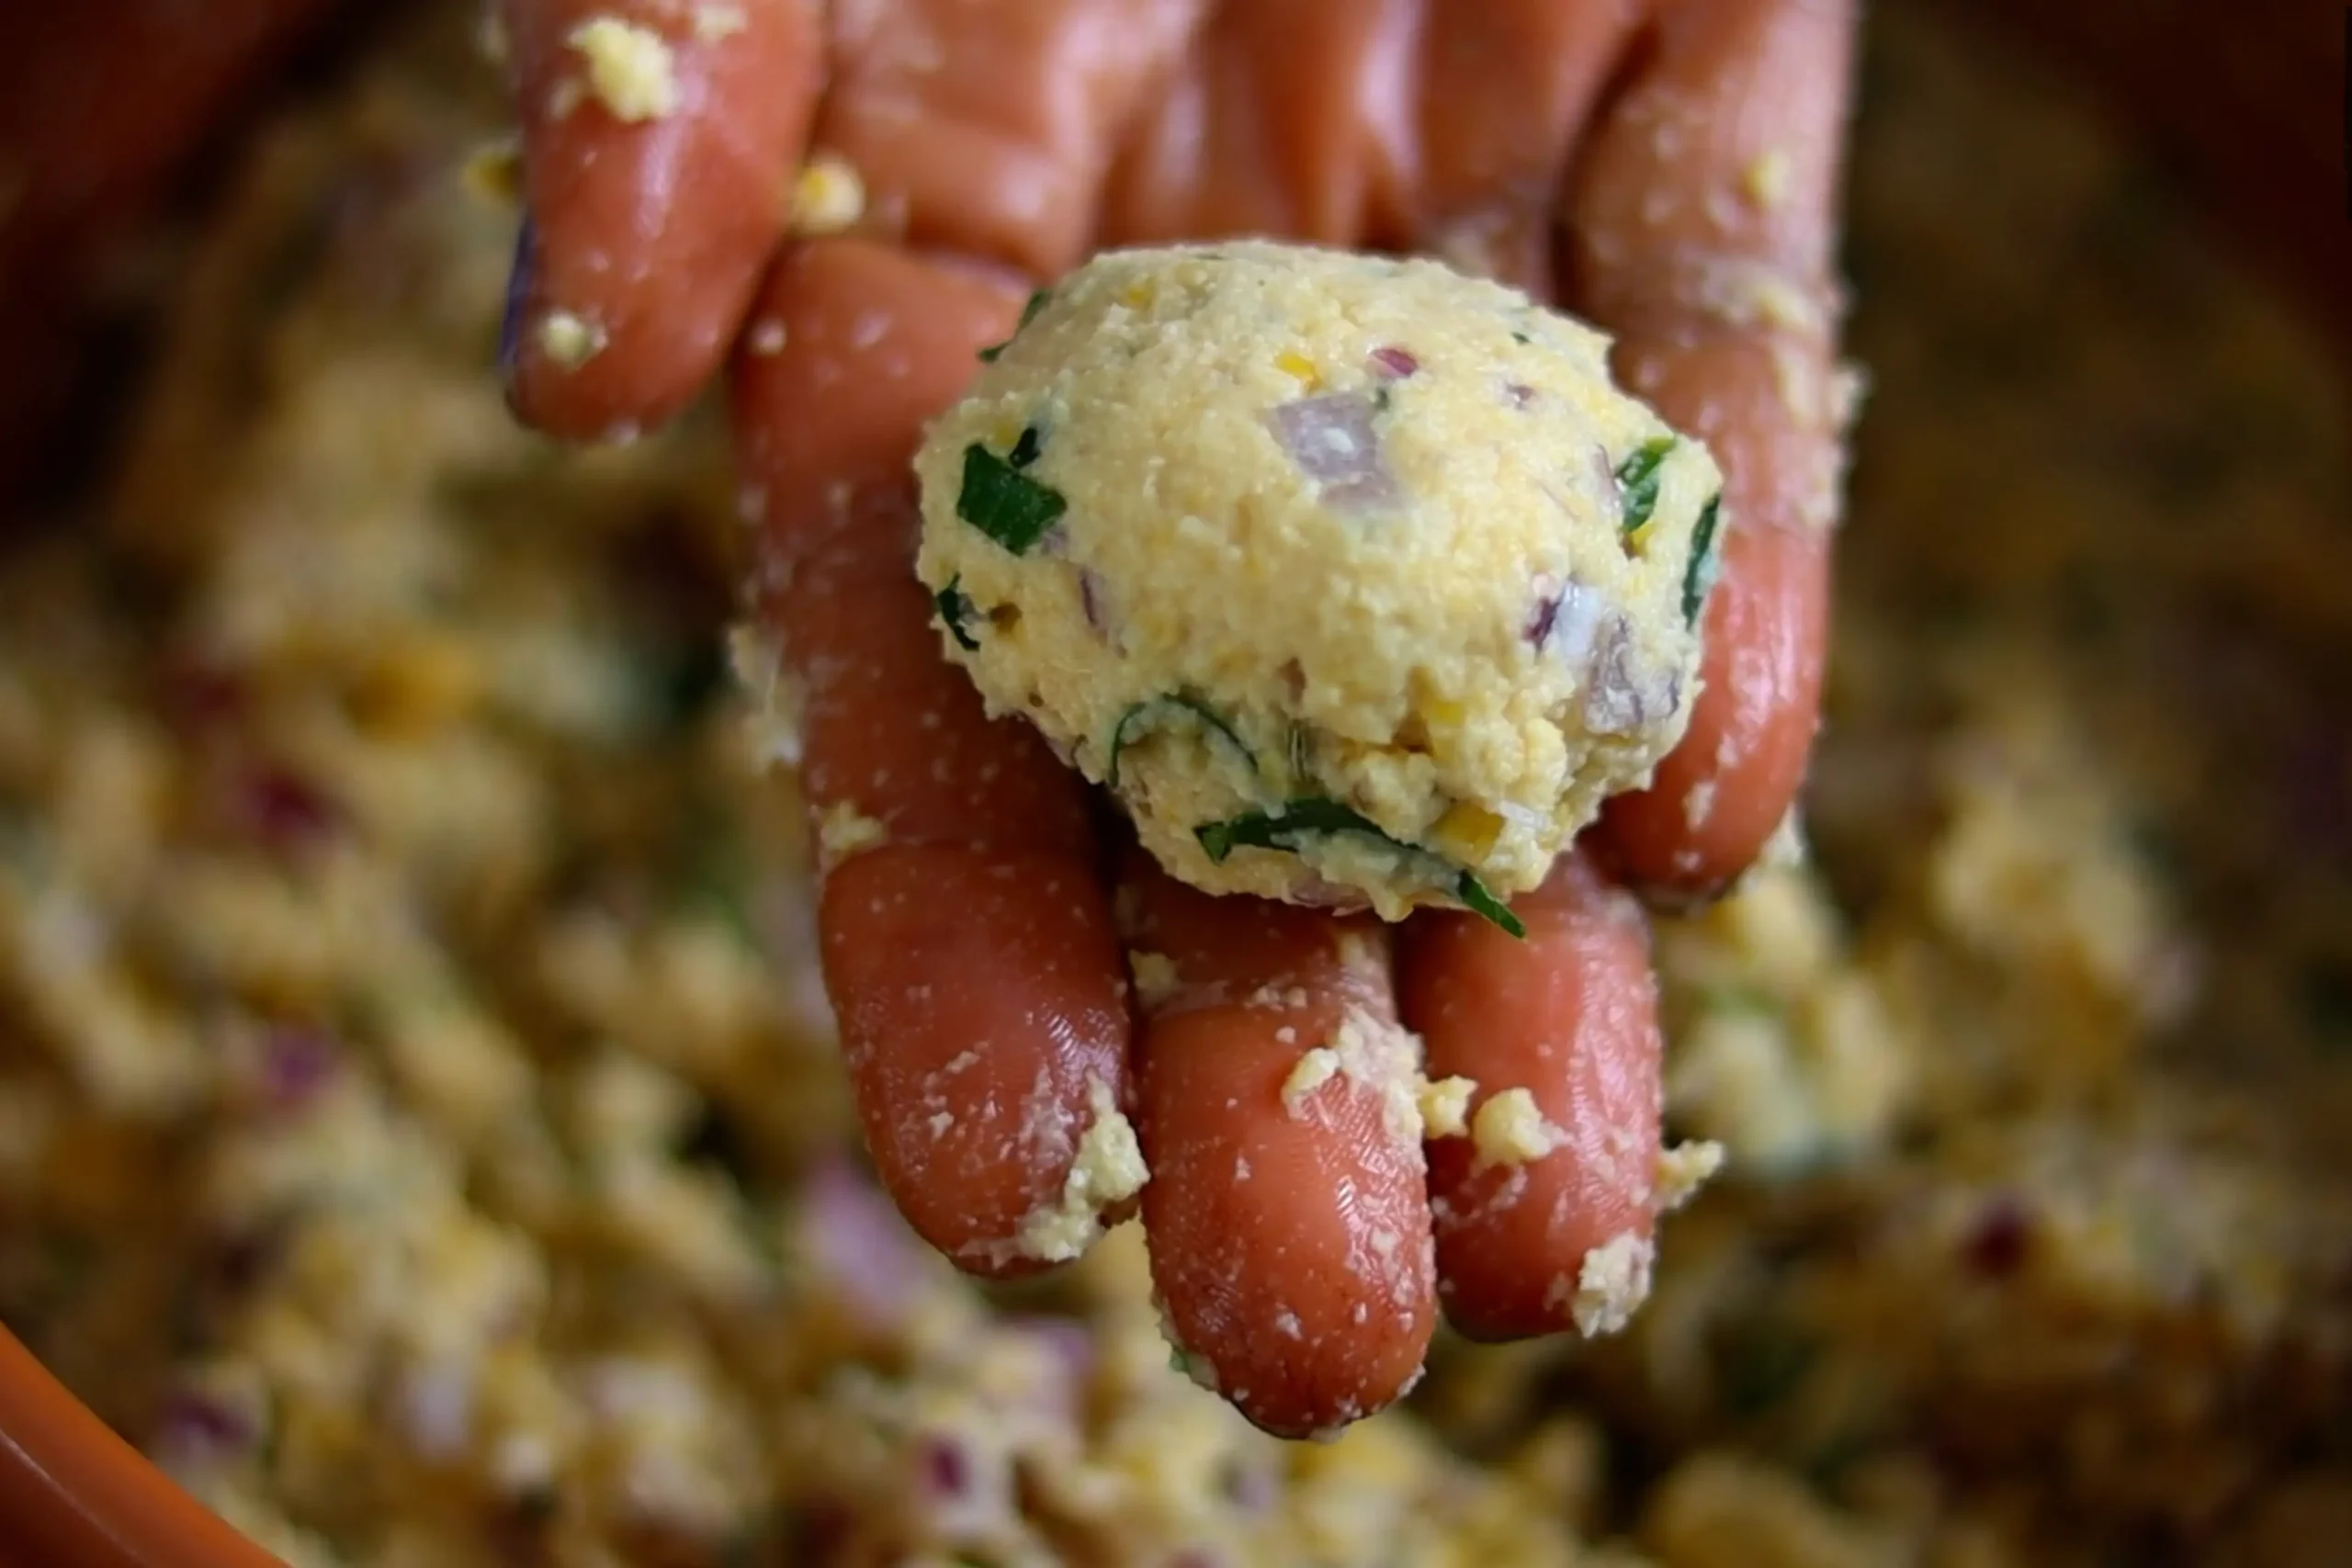
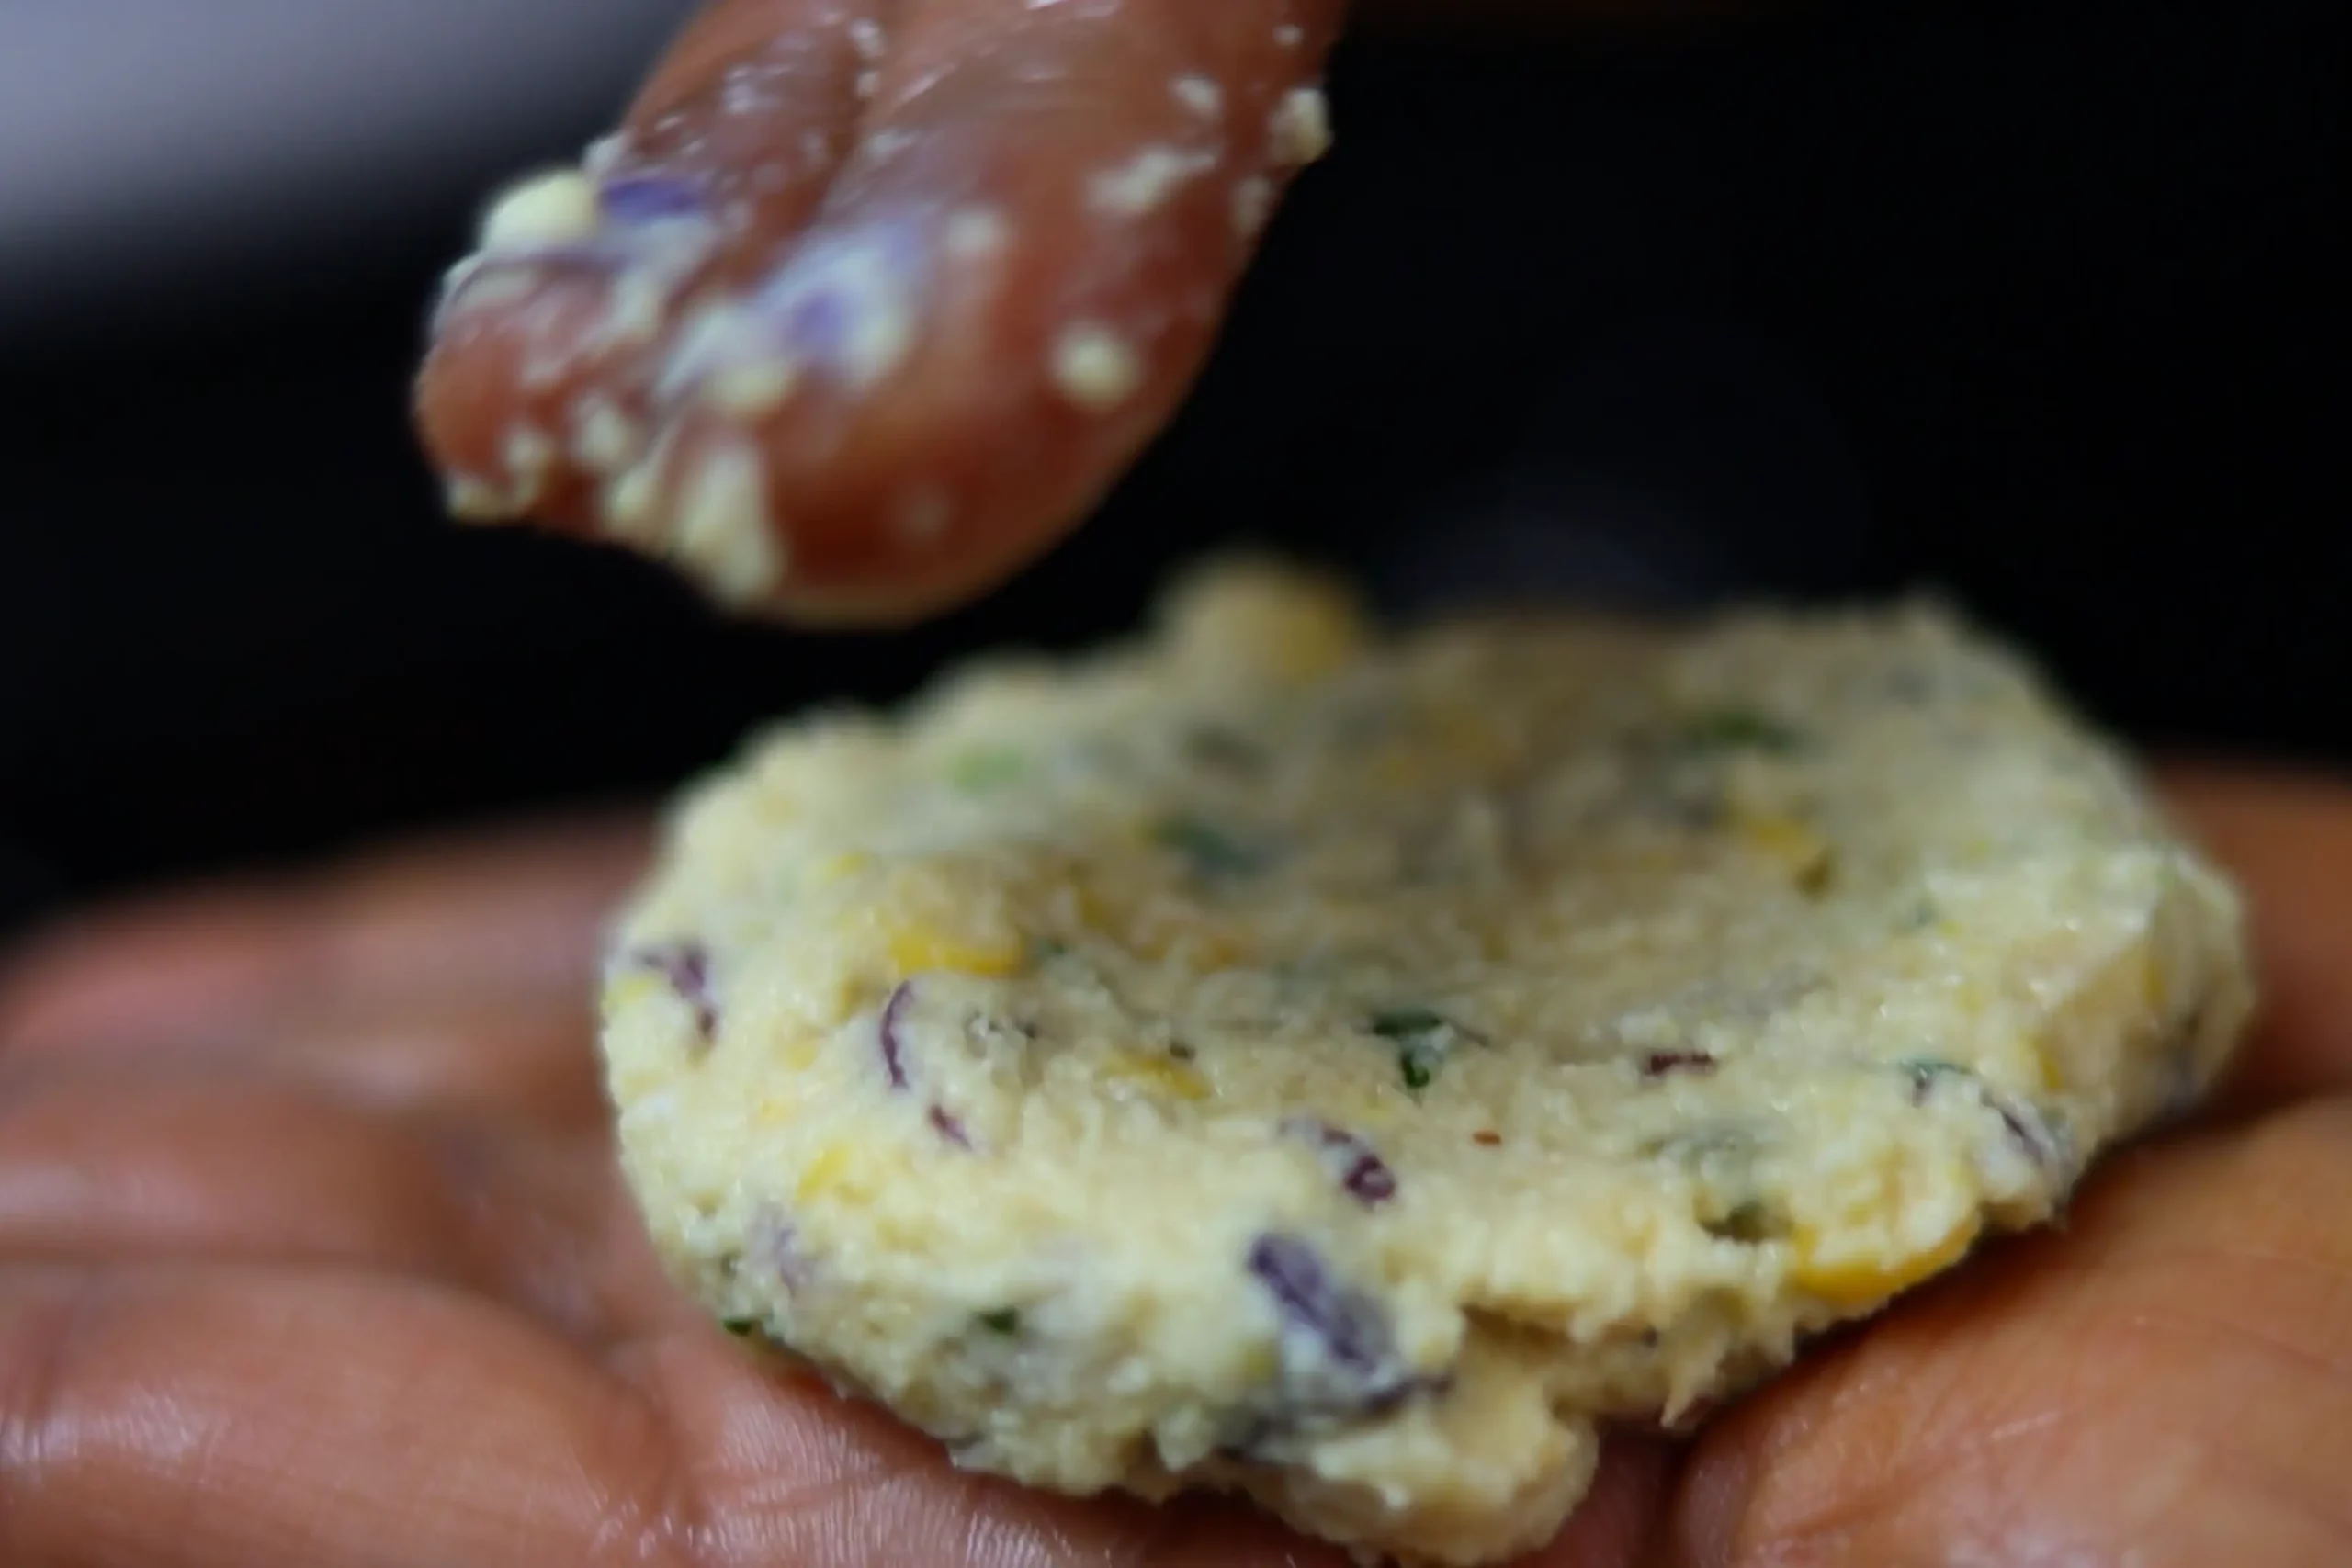
- Take lemon sized or small balls of the mixture and flatten into round shaped discs using your palms. Carefully slide into hot oil in batches.
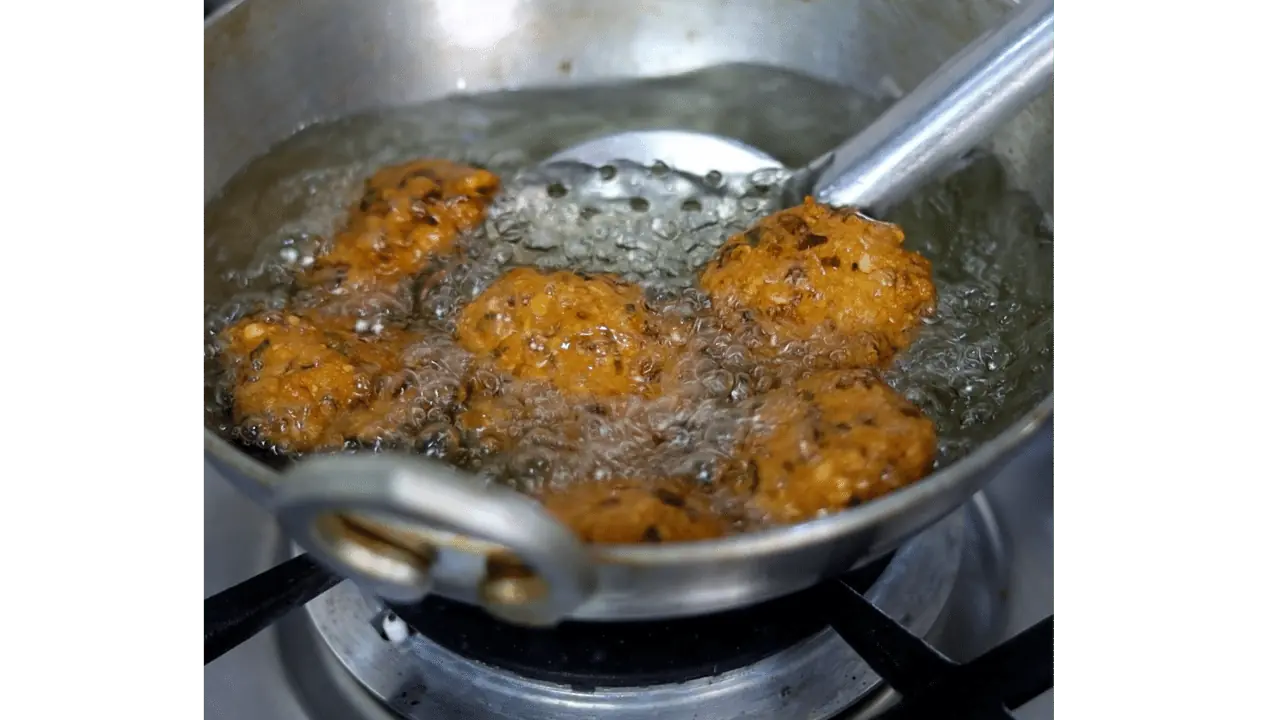
- Fry for 2-3 minutes until golden. Flip vadas using a slotted spoon and fry other side until crisp and golden brown.
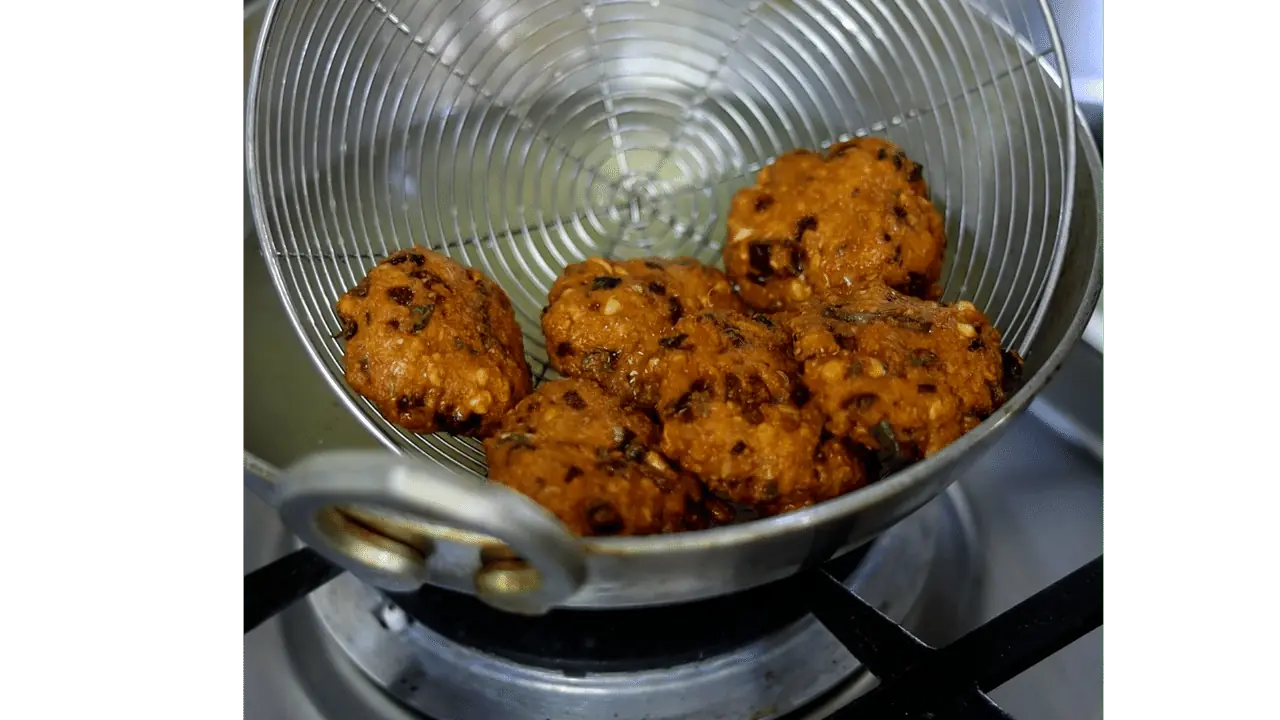
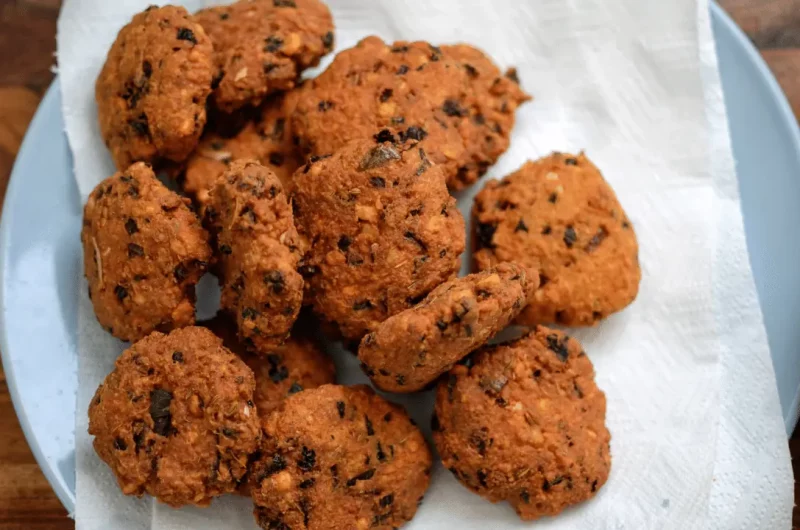
- Drain on kitchen paper towels and savour these crispy gems hot!
Tips for Foolproof Parippu Vada
Follow these tips and tricks for guaranteed fluffy, crispy vada every time:
- Don’t overgrind the dal – keep some texture for added bite.
- Do not overmix lentil batter
- The batter typically requires little to no water as onions naturally contains water
- Ensure oil is properly heated before frying. Test oil temperature by dropping a small bit of batter – it should sizzle on contact and should rise to the top
- Shaping vadas: Wet your hands to prevent sticking. Use a cookie cutter or mold for perfect rounds. Take small portion of the mixture.
- Fry in small batches to maintain oil temperature. Do not overcrowd the pan.
- Flip vada midway for even crispiness
- Oil choice: Opt for neutral oils with high smoke points, like peanut or sunflower oil.
Serving Suggestions
- Serve parippu vada hot, warm, or at room temperature as a snack or appetizer
- Pair with coconut chutney, tomato chutney, tamarind chutney, or coriander chutney for dipping
- Top with yogurt or raita for a cooling contrast
- Stuff inside pav or burger buns for a fusion twist
- Layer in a bowl or tray with rice, sambar, poriyal for a hearty meal
- Scatter as a topping over salads, bowls, or grains like quinoa
- Skewer and present as passed hors d’oeuvres at parties
Storage suggestions
- Store freshly fried masala vada or parippu vada in an airtight container for 2-3 days at room temperature
- Refrigerate in airtight container for up to 5 days
- Reheat refrigerated vada in microwave or conventional oven before serving
- Freeze shaped, uncooked vada batter on a tray then transfer to airtight bags
- Freeze cooked vada once cooled; reheat directly from frozen state
- Prepare vada batter in advance but fry just before serving for maximum crispness
Commonly Asked Questions
🔶 How long to soak chana dal for parippu vada?
- Soaking time: Most recipes recommend soaking for 2-4 hours, but you can shorten it to 1 hour if pressed for time. Longer soaking ensures softer vadas.
- Soaking liquid: Water is preferred, but buttermilk or yogurt can add a tangy touch.
🔶 What to add to parippu vada batter for crispness?
- Key ingredients: Adding chopped onions and fennel seeds helps with crispness. Also, I suggest frying a few curry leaves in the oil first for extra flavour.
- Batter consistency: Avoid adding too much water to the batter. I dont add any extra water at all to the batter. The onions will release moisture as they cook, contributing to crispness.
🔶 Can I grind parippu vada batter in a blender?
Blender vs. Mixie:
- Both tools work: Mixies are often preferred for grinding Indian batters due to their superior grinding power. However, blenders can work well with a little extra grinding time.
🔶 Do I need to add baking soda to parippu vada batter?
- Optional: Adding a pinch of baking soda can make vadas lighter and fluffier. However, it’s not essential for good results.
🔶 How do I make the parippu vadas more healthy?
- Oil-free: Baking or air frying are healthier alternatives to deep frying. You can also pan-fry with minimal oil using a non-stick pan.
- Oats or quinoa: Adding these grains can increase fiber content and add a slightly different texture.
- Diabetic-friendly: Use sprouted lentils or adjust spices to reduce sugar content.
🔶 Which oil is best for frying parippu vada?
Opt for neutral oils with high smoke points, like peanut or sunflower oil.
Recipe Card – Parippu Vada recipe
Perfectly Crispy Yet Soft Parippu Vada recipe
Course: Snacks, Entree, AppetizersCuisine: South IndianDifficulty: Moderate4
servings15
minutes10
minutes10
minutes2
hours35
minutesHealthy, vegetarian and crispy dal vada or parippu vada (Chana Dal Fritters) served alongside cooling coconut or coriander chutneys makes for a soul-satisfying anytime snack.
Ingredients
1 cup chana dal (Bengal gram)
2 medium onions, finely chopped
6 cloves garlic
1 inch ginger, roughly cut
2 tbsp fennel seeds
6 green chilis, minced. Please note that we used frozen chillies so the spice levels are mild. If your chillies are spicy( the ones that you get in India), adjust accordingly
Handful or 5 sprigs fresh curry leaves, finely chopped
Oil for frying (peanut, vegetable, coconut, etc.)
salt to taste
Directions
- Making the Batter
- Drain the soaked chana dal ( for 2 hours) and transfer to a mixer grinder or a blender. Add the garlic, ginger and 1 tbsp fennel seeds. Grind to a medium coarse texture, scraping the sides as needed. The texture should have some whole dal remaining for that extra crunch while biting into the vadas. Do not add water while grinding.
- Transfer the ground mixture to a bowl. Season with salt to taste, curry leaves, green chilies, onions and 1 tbsp fennel seeds. Mix everything well, using your hands if needed. Do not add any extra water.
- Take lemon sized balls of the mixture and flatten into discs using your palms and keep aside.
- Frying the Vadas
- Heat oil in a kadai/wok on medium flame. Test oil temperature by dropping a small bit of batter – it should sizzle on contact and should rise to the top.
- Carefully slide those flattened vada batter into hot oil in batches.
- Fry for 2-3 minutes until golden. Flip vadas and fry other side until crisp and golden brown.
- Drain on paper towels and serve hot
Recipe Video
Notes
- Shaping vadas: Wet your hands to prevent sticking. Use a cookie cutter or mold for perfect rounds.
- Oil choice: Opt for neutral oils with high smoke points, like peanut or sunflower oil.
- Do not add extra water to the batter as onions naturally contains water
- Read the Tips section above for more pro tips.
Discover more from The Kitchen Code
Subscribe to get the latest posts sent to your email.


One Comment